February Makeover: Bookshelf Organization with Chasing Paper

IMG_6629.jpg
IMG_6598 before
IMG_6598 before

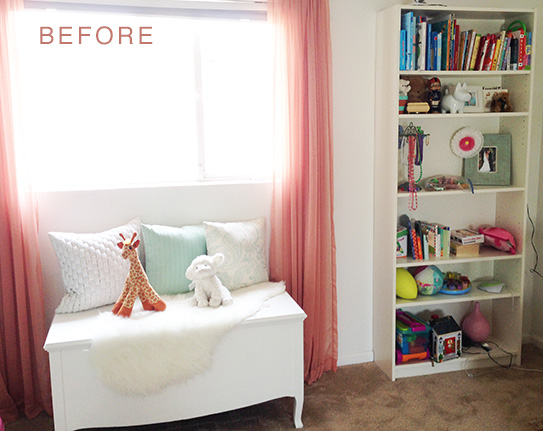
Ever since I finished Elle's nursery in 2012 I've always wanted to wallpaper her bookshelf and make it more dynamic. But with the busyness of becoming a new mom, making over her bookshelf quickly became one of my last priorities.

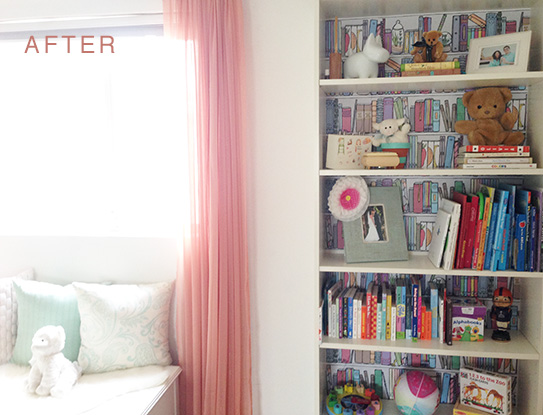
Along came Chasing Paper....They have changed the way wallpapering is done. With a simple measure, peel and stick - you can transform your walls, your tables and even your bookshelves. I chose a pastel illustrated book pattern by artist, Samarra Khaja. It matched the decor of Elle's room without being overly matchy. I also loved how the imagery filled in a lot of the white space that was bothering me so much.

IMG_6608
IMG_6608
IMG_6612
IMG_6612

I simply removed all of the shelves from the bookshelf, measured, peeled and stuck the paper to the back of the bookcase. In hindsight, I should have removed the flimsy cardboard backing of the bookshelf and pasted the wallpaper the cardboard while it was lying down on a hard surface. The really tricky part of hanging the wallpaper was the give of the cardboard, which made it difficult to hang the paper straight. It took me several times, but the great thing is that you can re-stick this wallpaper a lot and the adhesive doesn't ever seem to wear off.

IMG_6632
IMG_6632

Four sheets of paper later, and voila! We have a transformed, colorful bookcase.

IMG_6624 after
IMG_6624 after

Try it for yourself. I was able to do this project in under two hours.

DIY Credenza & Chalk Art

diycredenzapin.jpg

For three years I've known I wanted to build a "fauxdenza" in our kitchen. When I saw the DIY originally on The Brick House, I knew it was the perfect solution for our insanely long wall in the kitchen. We have a 1950's ranch home that lacks storage, and this credenza would not only serve as a decorative bar, but as a place to store placemats, napkins, vases and other nicknacks that you collect over the years. credenzabeginning2 credenza1

We started with Ikea kitchen cabinets. We bought four of them to span 10 feet. We chose the matte white doors (your cheapest option) and followed the shopping list on The Brick House's blog (below). We followed the installation instructions and asked my father-in-law to help Ryan since the cabinets are pretty heavy and the process is time consuming.

FAUXDENZA (from The Brick House)

Dimensions: 10′ long x 13-1/2″ deep x 33″ tall

Materials from Ikea:

8  -  Applad Doors (15 x 18″) 4  -  Akurum Wall Cabinets (30 x 18″) 8  -  Integral Hinge (2 pack) 2  -  Akurum Suspension Rail

credenzaedge

The wood we chose to float on the top and sides of the cabinets is poplar from The Home Depot. The top is one continuous piece of wood that was cut to size by the lovely people at Home Depot. It was stained with Minwax's golden oak and sealed with Minwax's clear satin finish (also found at The Home Depot).

credenzaside

We had our friend Mason install the wood because he is a professional handyman, and we had one shot at fitting the wood.

credenzafinal

Such a long piece of furniture calls for a large piece of art work. We decided chalk art would complement the rustic quality of the wood. Chasing Paper makes a stickable chalk paper that was easily to apply. You can see the process in the photos below.

chasingpaperblogchasingpaper4

We simply measured the area, cut the paper and stuck it to the wall.

chasingpaper1

For the chalk art I asked my friend Katie Sterbenz to create a custom drawing of the verse in Acts that says, "They broke bread in their homes and ate together with glad and sincere hearts." I thought it was the perfect message for the kitchen because that's what Ryan and I really want our home to be all about - a place to enjoy community and celebrate the great things God has done.

chasingpaper3chasingpaper2

Katie used a transparency and overhead projector to help her. She used several different sized chalk pens to draw everything. You can purchase this print (in a smaller size) for your home and others when you visit her Etsy shop.

You can see how incomplete everything was without the wood on the shelves and the wood around the art. We had Mason create a frame for Katie's piece with the same poplar wood. We stained it with the golden oak color to match the credenza.

credenzafinal2finalcredenza1

Dining Room Transformation

chasingpaperafter3.jpg
beforechasingpaper
beforechasingpaper

I like white walls. My whole house is painted white. I just enjoy spaces with a lot of natural light and brightness. Here's the thing though...Having my whole house painted white can make it feel big and empty, and making my home feel comfortable and cozy is important to me.

I had thought about using wallpaper on an accent wall in my dining room, but over the past three years I have chickened out. It's hard to install and wallpaper is pretty permanent. Then comes along Chasing Paper - a wallpaper company that makes stickable wallpaper that you can easily remove. Why not try it?! My friend Jessica Helgeson used it in her kitchen, and it completely transformed the space.

chasingpaperafter
chasingpaperafter

You simply peel and stick! Our walls aren't completely smooth, so I would recommend sanding your walls a bit if there are any bumps or imperfections. Also, since our house was built in 1953 it has settled quite a bit causing the ceiling not to be completely level. That made it way more challenging to get the wall paper straight, but the fact that I could unstick and re-stick the pieces came in handy!

To make the reveal more dramatic, Malori Maeva of Hoot and Holler designed a beautiful, modern fall tablescape. More on that tomorrow, but for now I'd love to hear what you think of the transformation!

*This post is sponsored by Chasing Paper